Zip File
Extract the zip file to the folder of your choice and start WinShell.exe.
Permission to use, copy and distribute this software and its documentation for any purpose is hereby granted without fee, provided that the above copyright notice and this permission notice appear in all copies of this software and related documentation.
THE SOFTWARE IS PROVIDED 'AS-IS' AND WITHOUT WARRANTY OF ANY KIND, EXPRESS, IMPLIED OR OTHERWISE, INCLUDING WITHOUT LIMITATION, ANY WARRANTY OF MERCHANTABILITY OR FITNESS FOR A PARTICULAR PURPOSE.
IN NO EVENT SHALL INGO H. DE BOER OR ANY PERSON OR INSTITUTION RELATED TO INGO H. DE BOER BE LIABLE FOR ANY SPECIAL, INCIDENTAL, INDIRECT OR CONSEQUENTIAL DAMAGES OF ANY KIND, OR ANY DAMAGES WHATSOEVER RESULTING FROM LOSS OF USE, DATA OR PROFITS, WHETHER OR NOT ADVISED OF THE POSSIBILITY OF DAMAGE, AND ON ANY THEORY OF LIABILITY, ARISING OUT OF OR IN CONNECTION WITH THE USE OR PERFORMANCE OF THIS SOFTWARE.
WinShell is a free multilingual integrated development environment (IDE) for LaTeX and TeX. The program includes a text editor, syntax highlighting, project management, a spell checker, a table wizard, a BibTeX front-end, different tool bars and user configuration tools. It is not a LaTeX system; an additional LaTeX package is required.
Operating System: Windows 10 or higher.
A LaTeX package is a prerequisite to WinShell. Please install one of the following packages:
TeXLive: https://www.tug.org/texlive/
MiKTeX: https://miktex.org/
W32TeX: http://w32tex.org/
WinShell has a built-in spell checker based on hunspell. Additional hunspell compatible dictionaries can be imported. WinShell's import supports:
Plain .dic/.aff dictionary files: http://hunspell.github.io/
FreeOffice .sox files: https://www.freeoffice.com/en/download/dictionaries
OpenOffice .oxt files: https://extensions.openoffice.org/
FireFox .xpi files: https://addons.mozilla.org/en-US/firefox/language-tools/
Please note: Before downloading any dictionary from the above links, please read the download information carefully. The dictionaries are licensed under different open-source licenses (e.g. GPL, LGPL and/or MPL). If you do not accept the license terms for a dictionary, please do not use it with WinShell.
A PDF viewer is a prerequisite to WinShell. Please install one of the following viewers:
Sumatra PDF: https://www.sumatrapdfreader.org/free-pdf-reader.html
Foxit Reader: https://www.foxitsoftware.com/pdf-reader/
Adobe Reader: https://get.adobe.com/reader/
WinShell supports and recommends Sumatra PDF which supports SyncTeX and allows forward and inverse search in .pdf documents.
A postscript viewer is optional and not necessary if the focus is on creating .pdf documents.
To install Ghostscript and the GSViewer to view the .ps documents download from: https://www.ghostscript.com/
WinShell comes as a zip file and as a complete setup program. Only one is required!
Extract the zip file to the folder of your choice and start WinShell.exe.
The setup program copies all the WinShell files to a specific folder, e.g. C:\Program Files\WinShell. Registry entries are made for e.g. the icon and loading of the .tex file.
Hint: By default, WinShell tries to find the executable files by searching the registry. The LaTeX binary path should be added to the environment variable PATH. That is why WinShell should be installed in the last stage of the complete installation procedure.
This software is supplied in a binary format ('as is') for free - the source code is not available.
There are many expenses I incur in maintaining the WinShell project that may not be apparent, such as web hosting costs and the costs of new operating systems and software I have purchased especially for writing and testing WinShell. If you desire, you may send me donations of any amount or kind towards my efforts for keeping the WinShell project alive.
Although donations received are very much appreciated, those that do make donations do not automatically receive preferential treatment over those who don't.
Please visit the donation homepage for further details.
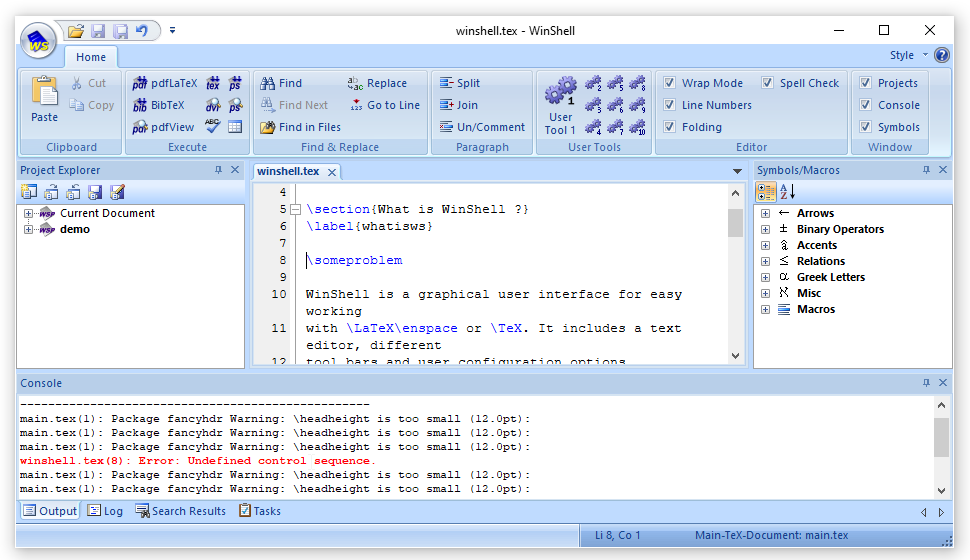
The graphical user interface of WinShell contains different parts:

The header bar indicates a subset of commands which are available in WinShell. The 'WS'-Button takes actions on documents and sets the options for WinShell.
The tool bar is displayed across the top of the application window, below the header bar and provides quick mouse access to some of the WinShell features.
The status bar is displayed at the bottom of the WinShell window. The right area of the status bar describes the current line and column of the cursor in the text, as well as the main TeX document.
This area shows the current open documents in a tab view.
In the project window the different projects can be explored.
From symbols and macros window the symbols and macros can be dragged and dropped into the current document.
The console window shows information from the log files, searches and tasks.
The usage of the Project Explorer allows to manage the documents and the information about a project. A project document contains relative pathnames. A demo project is included in the WinShell package which will be loaded at first start. The demo is stored in the folder 'Demo'. Open the demo project. Click on the LaTeX button of the tool bar. Take a look at the demo project with the viewDVI or viewPDF application or generate a .pdf or .ps document. If you get any error message, the LaTeX package could be installed incorrectly.
The project which will be compiled is marked bold in the Project Explorer. If you want to compile a different project (like the "Current document"), you need to activate the project with the "Activate" command in the context menu.
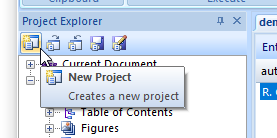
| New Project | Creates a new WinShell project. |
| Open Project | Opens an existing WinShell project. |
| Close Project | Closes the active WinShell project. |
| Save Project | Saves the active WinShell project. |
| Save Project As | Saves the active WinShell project under a new name. |
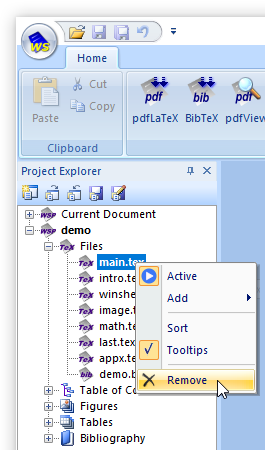

A context menu pops up after a right mouse click depending on the tree entry the mouse focuses.
| Activate | Activates this project. |
| Add | Adds documents to this project. |
| Remove | Removes this documents from this project. The document itself will not be deleted. |
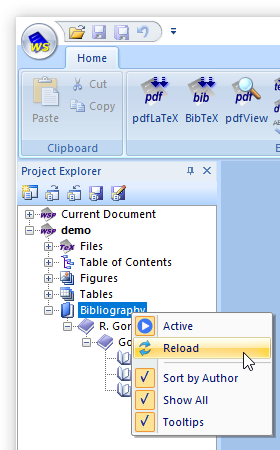
| Reload | Reloads the information of the project. |
| Tooltips | The tooltip for the project entry shows the working path and for the document entries it shows the complete path. |
| References and Citations | References to figures and tables and citations of BibTeX entries can be inserted directly into the current cursor position in the text. |
| Sort | The documents, figures and tables can be alphabetically sorted. When disabled, the documents appear in the order in which they have been included into the project. |
| Sort by Author | The Project Explorer sorts the shown BibTeX entries by BibTeX author field, if this check mark is set. Otherwise the sorting is by BibTeX label field. |
| Show All | The Project Explorer shows all BibTeX entries, if this check mark is set. |
A double click on an item of the project has the following effects:
| Documents | A .tex document will open at line 1 or simply shown if it is already opened. A .bib document will open with the BibTeX front-end or a text window depending on the WinShell option settings. |
| Table of Contents | The document will open at that specific line position. The 'Table of Contents' contains: \chapter \section \subsection \subsubsection. |
| Figures | The document will open at the line of the figure. The document name and the line of the figure is shown in the entry if the figure has no label. WinShell only takes the figure environment into account. |
| Tables | The document will open at the line of the table. The document name and the line of the table is shown in the entry if the table has no label. WinShell only takes the table environment into account. |
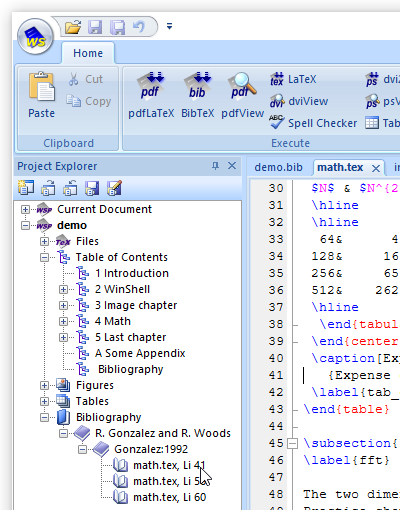
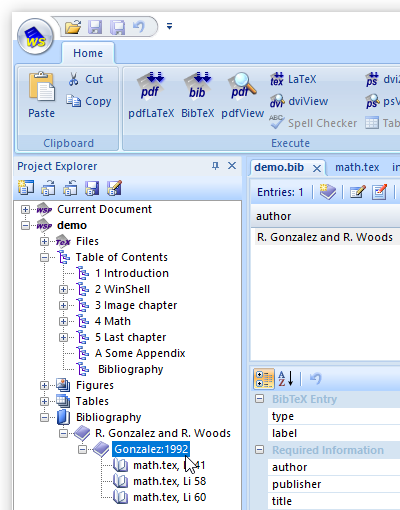
| Bibliography | Bibliography label: Opens the BibTeX document in the BibTeX front-end at the position of the BibTeX entry. Subtree of the bibliography label: Opens the .tex document at the given line. This is where the BibTeX entry is cited. |
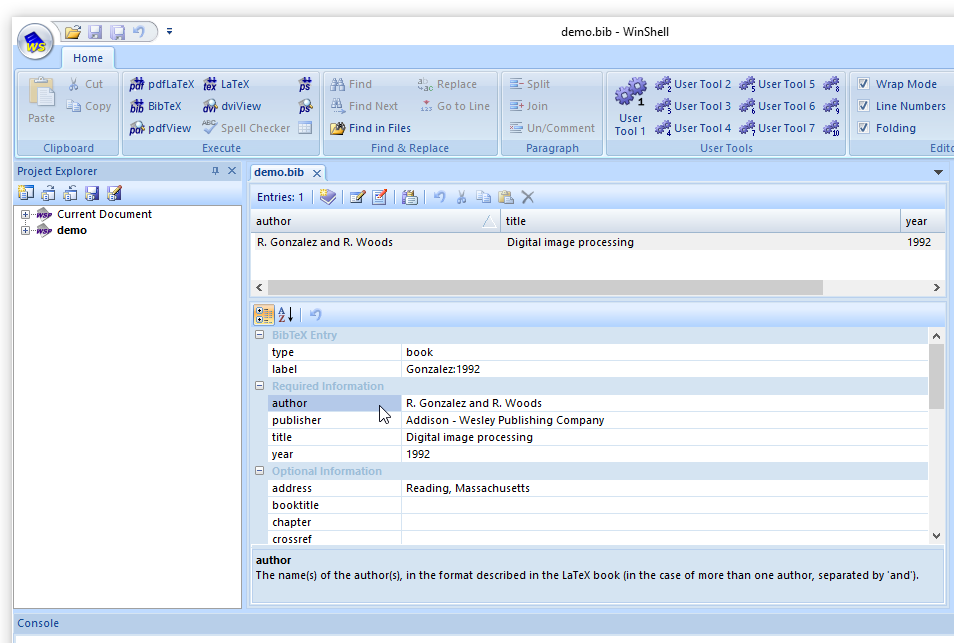
A .bib document it is automatically shown in the BibTeX front-end if the check mark in the 'General' options tab is checked.
In the upper view one can find an overview list of all the BibTeX entries. By clicking with the
mouse on the header the list can be sorted. A triangle indicates an ascending or descending
order. Clicking a single line shows the detailed information of the BibTeX entry in the lower
view. There is the type and label information followed by the required and the optional fields.
Each type has a set of required and optional fields.
For faster navigation in the lower view, one can use the TAB key to navigate to the different
fields. If the field to change has been reached, a hit on the RETURN key will change into
edit mode of this field.
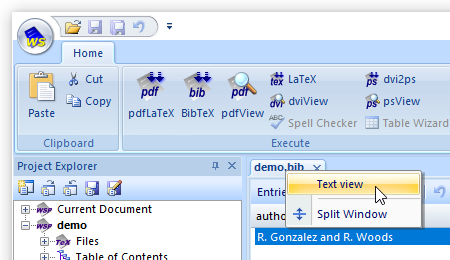
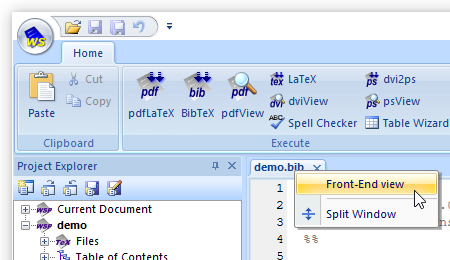
It is possible to switch between the text view and the editor view via the context menu of the tab of the document:
Hint: For a .bib document depending on the upper or lower view of the BibTeX front-end a complete list or a single BibTeX entry will be printed.
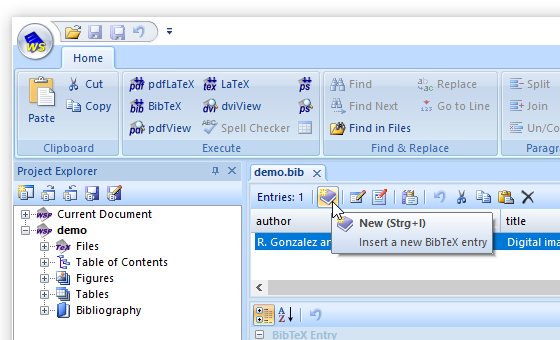
Via the tool bar menu the .bib document as well as the BibTeX types, fields, strings, preamble can be changed. The copy mechanism works from valid BibTeX format text input, also the paste mechanism copies a BibTeX entry in BibTeX format to the clipboard.
| Entries | The number of entries in the list. |
| New | Via the tool bar or via the keyboard shortcut CTRL + I a new BibTeX entry is created of the type article with unknown author, unknown journal, unknown title, the current year and a random label. |
| Edit Strings | Opens a dialog to edit the strings of the .bib document. |
| Edit Preamble | Opens a dialog to edit the preamble of the .bib document. |
| Edit Types and Fields | Opens a dialog to edit the types and fields of the known WinShell types and fields. |
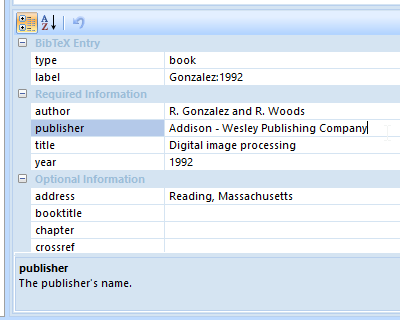
A BibTeX entry can be edited in the lower view where the detailed information is displayed. The edit box on the right of each field can be activated by a mouse click and then be edited.
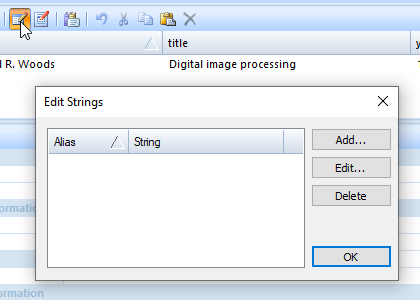
To edit the strings of the .bib document, choose accordingly in the tool bar. A dialog pops up and the strings can be modified.
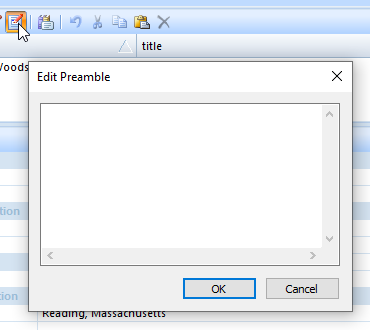
To edit the preamble of the .bib document, choose accordingly in the tool bar. A dialog pops up and the preamble can be typed in.
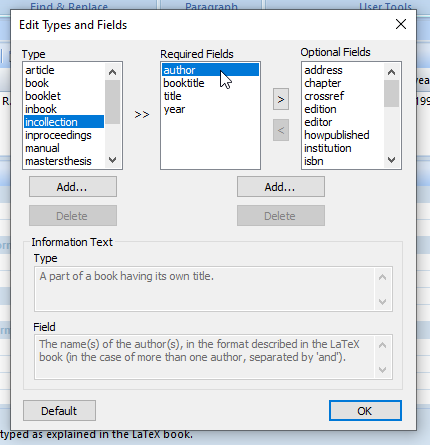
To modify the types and fields, choose accordingly in the tool bar. A dialog pops up and the types and fields can be modified.
When a type is selected the required and optional fields are displayed accordingly. An information text about the currently selected type and field is shown and can be edited. Any modification of the information text will be stored.
New types and fields can be added via the 'Add...' button. User types and fields can be deleted via the 'Delete...' button. The standard types and fields cannot be deleted.
The 'Default' button resets all the types and fields to the standard ones and all user types and fields will be deleted. With the '>' and '<' buttons it is possible to change the required and optional fields for a type.
WinShell has a built-in spell checker. Only a dictionary needs to be downloaded, see here.
The spell checker check mark in the tool bar enables or disables the automatic spell checking.
Unknown words are squiggly underlined. The color of the squiggly line can be set in the 'Options->Text Editor->Syntax Highlighting' menu.
Different features how to handle the unknown word are provided via the context menu (right mouse button click over an unknown word).
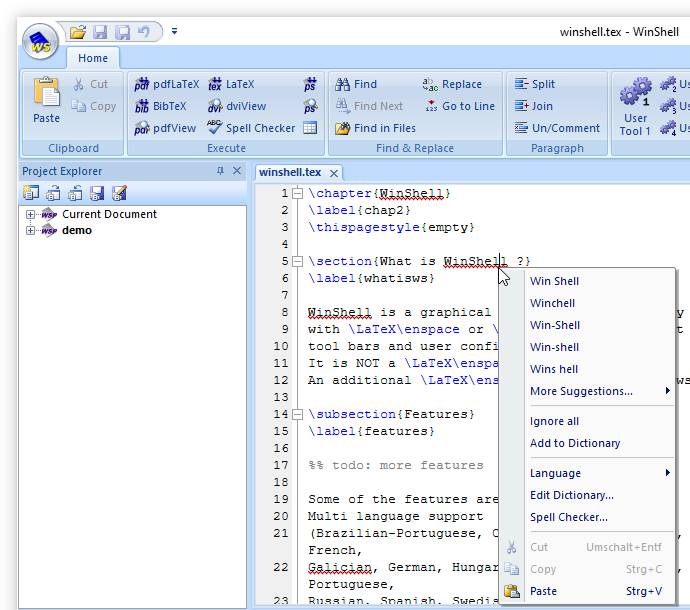
The first entries in the context menu are suggestions to replace the unknown word. Choosing one of them replaces the unknown word in the text. Other options are to ignore the unknown word in the text or even store it in the personal dictionary for future spell checking. It is possible to choose the spell checking language from the context menu and edit the personal dictionary. Also, the spell check dialog can be started from the context menu.
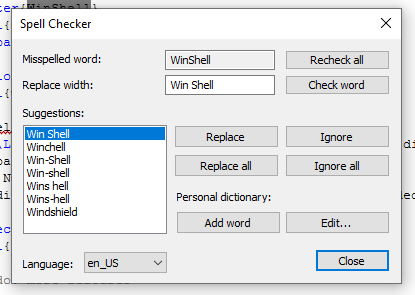
The dialog spell check button in the 'Execute' tool bar is enabled when a document is loaded. The checking starts from the current mouse position.
A dialog pops up to show the unknown word which is also highlighted in the document. A suggestion list is displayed.
At the bottom of the dialog the language of the dictionary can be chosen (left image).
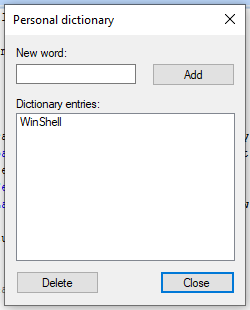
A personal dictionary can be created if the word is not in the given suggestion list.
The word can be added and the personal dictionary be edited (right image).
Additional hunspell compatible dictionaries can be imported. WinShell can import .dic/.aff, .sox, .oxt and .xpi files. Links to dictionaries can be found here.
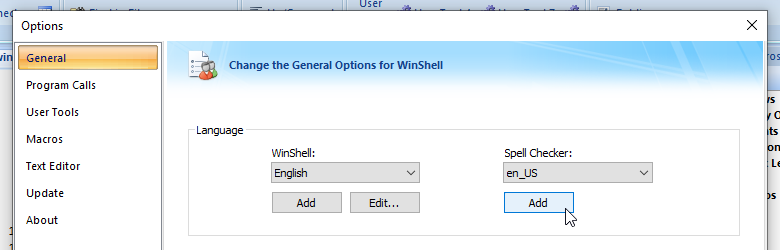
Download a dictionary to your Desktop and click the 'Add' button. A dialog box pops up to choose the downloaded file.
Please note: Before downloading any dictionary from the above links, please read the download information carefully. The dictionaries are licensed under different open-source licenses (e.g. GPL, LGPL and/or MPL). If you do not accept the license terms for a dictionary, please do not use it with WinShell.WinShell provides the following command line arguments, used for e.g. forward and inverse search:
-p project_file
-c current_tex_file [-l current line]
project_file
current_tex_file
E.g., the command line to open a document called winshell.tex at line position 23 would be: WinShell.exe -c winshell.tex -l 23
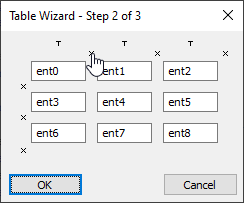
Step 1 Start the table wizard from the tool bar 'Execute - Table Wizard'. A dialog pops up where the user can set values for the columns and rows.
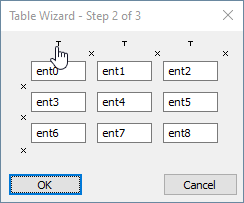
Step 2 The next dialog shows the table with the entries which are editable.
 |
centered text |
 |
right-aligned text |
 |
left-aligned text |
 |
no vertical/horizontal line |
 |
vertical/horizontal line |
 |
double vertical/horizontal line |
Step 1 Define the user tool in 'Options - User Tools'. Make the entries for the wanted program and press 'OK'. In this example, makeindex will be used. For more information about makeindex see the makeindex documentation.
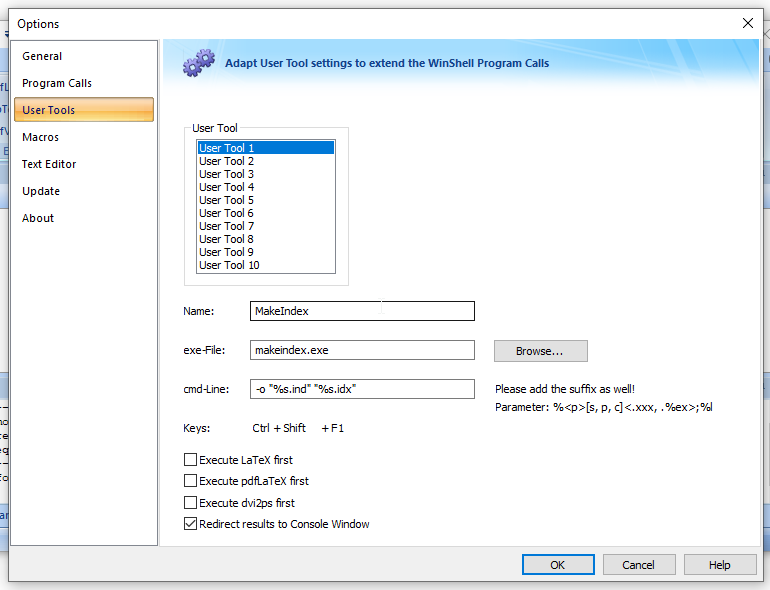
The parameters %<p>[s, p, c]<.xxx, .%ex>;%l have the following meaning:
| %s | use the document as specified in the status bar |
| %ps | use the document as specified in the status bar with full pathname |
| %pp | use the project pathname |
| %c | use the current document |
| %pc | use the current document with full pathname |
| xxx | an extension for the document, like 'tex', 'bib', etc. |
| %ex | the extension of the current document |
| %l | %l the current cursor line of the current document; if no line is given, %l is 0 |
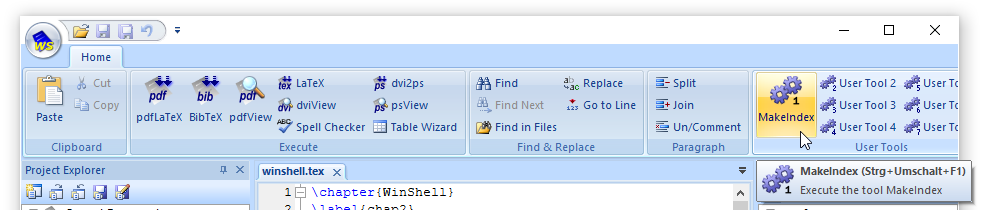
Step 2 The user tool is ready in the 'User Tools' tool bar section for execution.
Step 1 Define the macro in 'Options - Macros'.
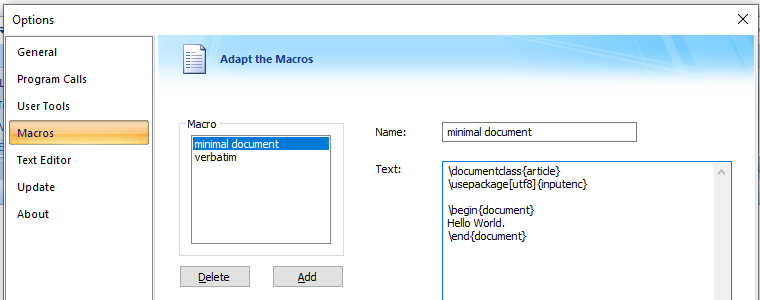
Different tags are provided inside a macro for special features after the macro was inserted into the text:
| <cur> | Sets the cursor position to that specific position. |
| <sel> | Replaces a selected text at that specific position. |
Step 2 Double click or drag&drop the macro from the Symbols/Macros Window. Double click inserts the macro at the current position of the cursor in the text. Drag&Drop gives the freedom to postion the macro at any position in the text.
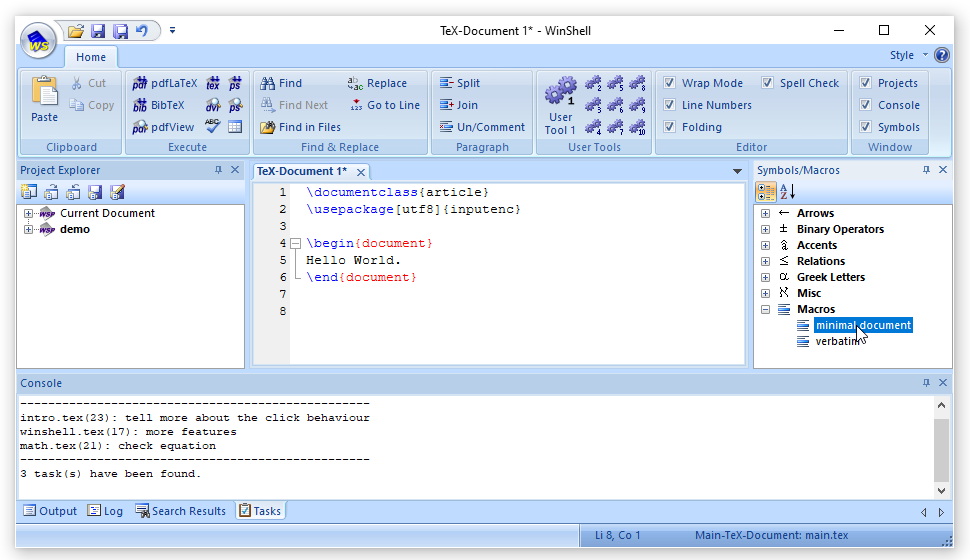
A double click on an error or warning line in the Output tab of the Console Window jumps to the specific line in the corresponding document. An error line is drawn in red.
Additionally, WinShell jumps automatically to the first error line when the check mark in the 'Options->Text Editor->General' dialog is set.
Hint: Adding the nonstopmode command to the pdfLaTeX program call prevents the pdfLaTeX run to stop at errors and makes a compilation of the complete project or document:
'Options->Program Calls', cmd-line: -interaction=nonstopmode "%s.tex"
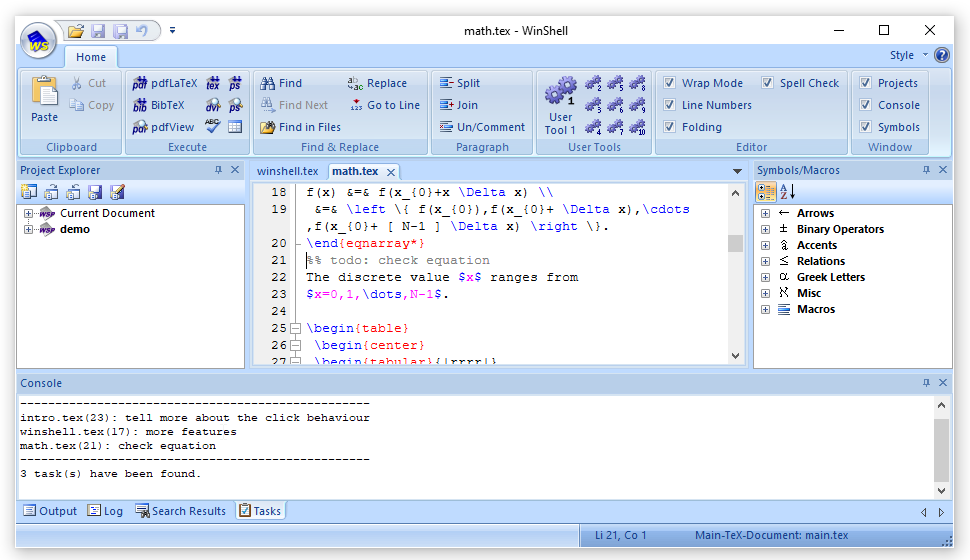
A double click on a line in the Tasks tab of the Console Window jumps to the specific line in the corresponding document. Tasks are marked with a '%% todo:' tag in the text. This feature provides some kind of reminder functionality. It can be used within a document or project where the user needs to add e.g. some additional information later.
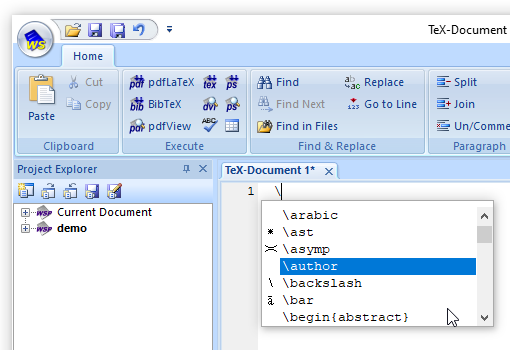
Auto completion in the text editor is initiated with a '\' followed by a combination of two keystrokes, namely CTRL and SPACE, at a time. After you have typed e.g. 'nbe' followed by CTRL+Space WinShell displays a list box showing likely identifiers. The currently selected item can be chosen by pressing the TAB key or via the mouse.
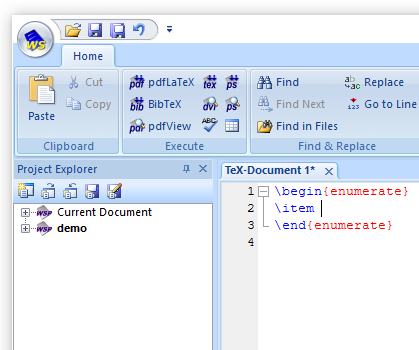
WinShell has an extended auto completion, meaning that not only the keyword is shown, but also the complete environment is filled into the text editor and the cursor is positioned at a reasonable position.
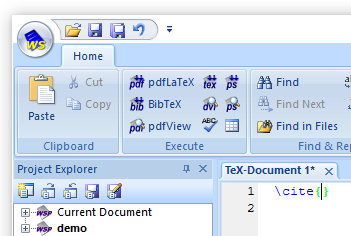
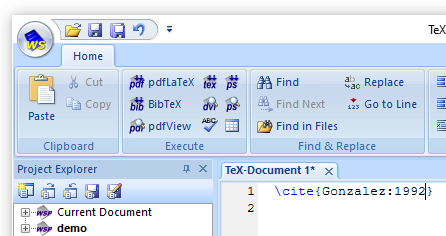
Autocompletion also works with the BibTeX entries. Type the keyword '\cite' and place the cursor is in between the braces (Auto completion will do this automatically). Another CRTL+Space keystroke will show a list of the labels which can be inserted. The list of labels is generated from the BibTeX file(s) which belong to the active project.
If the likely identifier list contains only a single item, this single item will be automatically inserted without showing a selection list.
The forward and inverse search allows to jump from WinShell directly into the corresponding position of the .dvi or .pdf document and vice versa.
WinShell provides the following wild cards to use this functionality in WinShell:
| %l | the current line |
| %s | the main document |
| %c | the current document |
| WinShell | latex command line: -src-specials "%s.tex" |
| WinShell | dviView exe line: yap.exe dviView command line: -1 -s %l"%c.tex" "%s.dvi" |
| YAP | Name: WinShell Program: <path_to_winshell_exe> Arguments: -c "%f" -l %l |
| WinShell | latex command line: -src-specials "%s.tex" |
| WinShell | dviView exe line: dviout.exe dviView command line: -1 %s.dvi "# %l "%c.tex"" |
| dviout | src: <path_to_winshell_exe>^s -c "%s" -l %d |
| WinShell | pdflatex command line: -src-specials "%s.tex" |
| WinShell | pdfView exe line: sumatrapdf.exe pdfView command line: -reuse-instance -inverse-search "\"<path_to_winshell_exe>\" -c %f -l %l" "%s.pdf" |
| SumatraPDF | command: "<path_to_winshell_exe>" -c "%f" -l %l |
Regular expressions for the search and the replace dialog. Please refer to the Scintilla documentation for more information.
| . | Matches any character |
| \( | This marks the start of a region for tagging a match. |
| \) | This marks the end of a tagged region |
| \n | Where n is 1 through 9 refers to the first through ninth tagged region when replacing. For example, if the search string was Fred\([1-9]\)XXX and the replace string was Sam\1YYY, when applied to Fred2XXX this would generate Sam2YYY. |
| \x | This allows you to use a character x that would otherwise have a special meaning. For example, \[ would be interpreted as [ and not as the start of a character set. |
| [...] | This indicates a set of characters, for example, [abc] means any of the characters a, b or c. You can also use ranges, for example [a-z] for any lower case character. |
| [^...] | The complement of the characters in the set. For example, [^A-Za-z] means any character except an alphabetic character. |
| ^ | This matches the start of a line (unless used inside a set, see above). |
| $ | This matches the end of a line. |
| * | This matches 0 or more times. For example, Sa*m matches Sm, Sam, Saam, Saaam and so on. |
| + | This matches 1 or more times. For example, Sa+m matches Sam, Saam, Saaam and so on. |
Please download the latest version from the WinShell homepage and retry before sending any problem report. Include the following information in your email (in English or German only!) when sending a problem report:
Computer:
 Which Operating System including version and service pack?

WinShell:
 Which version of WinShell?

Problem:
 Description of the exact way how this error is reproducible.
 Please provide screenshots and/or sample TeX Documents.